day07【集合】 今日内容
Collections工具类
增强for循环
泛型
红黑树
Set集合
目标
第一章 Collections工具类 1.1 概述 java.util.Collections此类完全由在 collection 上进行操作或返回 collection 的静态方法组成。
1.2 常用方法
public static void shuffle(List<?> list) :打乱集合顺序。public static <T> void sort(List<T> list):将集合中元素按照默认规则排序。public static <T> void sort(List<T> list,Comparator<? super T> ):将集合中元素按照指定规则排序。
1
2
3
4
5
6
7
8
9
10
public static void main (String[] args) new ArrayList<Integer>();100 );300 );200 );50 );
1.3 比较器Comparator接口 创建一个学生类,存储到ArrayList集合中完成指定排序操作。
Student 类
1
2
3
4
5
6
7
public class Student private String name;private int age;
测试类
1
2
3
4
5
6
7
8
9
10
11
12
13
14
15
16
17
18
19
20
public static void main (String[] args) new ArrayList<Student>();new Student("rose" ,18 ));new Student("jack" ,16 ));new Student("abc" ,20 ));new Comparator<Student>() {@Override public int compare (Student o1, Student o2) return o1.getAge()-o2.getAge();for (Student student : list) {'jack' , age=16 }'rose' , age=18 }'abc' , age=20 }
第二章 增强for循环 2.1 概述 java.lang.Iterable接口,实现这个接口允许对象成为 “foreach” 语句的目标。 也就是说Iterable接口下的所有子接口和实现类,都能使用”foreach”语句。而Iterbale接口的一个子接口就是Collection接口,我们学习的集合都可以使用“foreach”语句,同时也包括数组。
2.2 格式 1 2 3 for (元素的数据类型 变量 : Collection集合or数组){
注意 :它用于遍历Collection和数组。通常只进行遍历元素,不能在遍历的过程中对集合元素进行增删改操作。
2.3 遍历数组,集合 1 2 3 4 5 6 7 8 9 10 11 12 13 14 15 16 public static void main (String[] args) int [] arr = {3 ,5 ,6 ,87 };for (int a : arr){new ArrayList<String>();"小河神" );"老河神" );"神婆" );for (String s :coll){
2.4 增强for循环原理:
增强for遍历数组,class文件反编译后就是传统形式for循环。
增强for遍历集合,class文件反编译后就是迭代器。
第三章 泛型 3.1 泛型概述 在前面学习集合时,我们都知道集合中是可以存放任意对象的,只要把对象存储集合后,那么这时他们都会被提升成Object类型。当我们在取出每一个对象,并且进行相应的操作,这时必须采用类型转换。
大家观察下面代码:
1 2 3 4 5 6 7 8 9 10 11 12 public static void main (String[] args) new ArrayList();"abc" );"itcast" );5 );while (it.hasNext()){
程序在运行时发生了问题java.lang.ClassCastException 。
为什么会发生类型转换异常呢?
我们来分析下:由于集合中什么类型的元素都可以存储。导致取出时强转引发运行时 ClassCastException。 怎么来解决这个问题呢?
Collection虽然可以存储各种对象,但实际上通常Collection只存储同一类型对象。例如都是存储字符串对象。因此在JDK5之后,新增了泛型 (Generic )语法,让你在设计API时可以指定类或方法支持泛型,这样我们使用API的时候也变得更为简洁,并得到了编译时期的语法检查。
注意 :一般在创建对象时,将未知的类型确定具体的类型。当没有指定泛型时,默认类为Object类型。
3.2 使用泛型的好处 上一节只是讲解了泛型的引入,那么泛型带来了哪些好处呢?
将运行时期的ClassCastException,转移到了编译时期变成了编译失败。
避免了类型强转的麻烦。
通过我们如下代码体验一下:
1 2 3 4 5 6 7 8 9 10 11 12 13 public static void main (String[] args) new ArrayList<String>();"abc" );"itcast" );while (it.hasNext()){
3.3 泛型的定义与使用 我们在集合中会大量使用到泛型,这里来完整地学习泛型知识。
泛型,用来灵活地将数据类型应用到不同的类、方法、接口当中。将数据类型作为参数进行传递。
定义和使用含有泛型的类 定义格式:
1 修饰符 class 类名<代表泛型的变量>
例如,API中的ArrayList集合:
泛型在定义的时候不具体,使用的时候才变得具体。在使用的时候确定泛型的具体数据类型。
1 2 3 4 5 6 class ArrayList <E >public boolean add (E e) public E get (int index)
使用泛型: 即什么时候确定泛型。
在创建对象的时候确定泛型
例如,ArrayList<String> list = new ArrayList<String>();
此时,变量E的值就是String类型,那么我们的类型就可以理解为:
1 2 3 4 5 6 class ArrayList <String >public boolean add (String e) public String get (int index)
再例如,ArrayList<Integer> list = new ArrayList<Integer>();
此时,变量E的值就是Integer类型,那么我们的类型就可以理解为:
1 2 3 4 5 6 class ArrayList <Integer > public boolean add (Integer e) public Integer get (int index)
含有泛型的方法 定义格式:
1 修饰符 <代表泛型的变量> 返回值类型 方法名(参数){ }
例如,
1 2 3 4 5 6 7 8 9 public class MyGenericMethod public <MVP> void show (MVP mvp) public <MVP> MVP show2 (MVP mvp) { return mvp;
调用方法时,确定泛型的类型
1 2 3 4 5 6 7 8 public static void main (String[] args) new MyGenericMethod();"aaa" );123 );12.45 );
含有泛型的接口 定义格式:
1 2 3 4 5 public interface MyGenericInterface <E >public abstract void add (E e) public abstract E getE ()
使用格式:
1、定义类时确定泛型的类型
例如
1 2 3 4 5 6 7 8 9 10 11 public class MyImp1 implements MyGenericInterface <String > @Override public void add (String e) @Override public String getE () return null ;
此时,泛型E的值就是String类型。
2、始终不确定泛型的类型,直到创建对象时,确定泛型的类型
例如
1 2 3 4 5 6 7 8 9 10 11 public class MyImp2 <E > implements MyGenericInterface <E > @Override public void add (E e) @Override public E getE () return null ;
确定泛型:
1 2 3 4 public static void main (String[] args) new MyImp2<String>(); "aa" );
3.4 泛型通配符 当使用泛型类或者接口时,传递的数据中,泛型类型不确定,可以通过通配符<?>表示。但是一旦使用泛型的通配符后,只能使用Object类中的共性方法,集合中元素自身方法无法使用。
通配符基本使用 泛型的通配符:不知道使用什么类型来接收的时候,此时可以使用?,?表示未知通配符。
此时只能接受数据,不能往该集合中存储数据。
举个例子大家理解使用即可:
1 2 3 4 5 6 7 8 9 10 11 12 13 public static void main (String[] args) new ArrayList<Integer>();new ArrayList<String>();public static void getElement (Collection<?> coll) while (it.hasNext()){
注意 :泛型不存在继承关系 Collection list = new ArrayList();这种是错误的。
通配符高级使用—-受限泛型 之前设置泛型的时候,实际上是可以任意设置的,只要是类就可以设置。但是在JAVA的泛型中可以指定一个泛型的上限 和下限 。
泛型的上限 :
格式 : 类型名称 <? extends 类 > 对象名称意义 : 只能接收该类型及其子类
泛型的下限 :
格式 : 类型名称 <? super 类 > 对象名称意义 : 只能接收该类型及其父类型
3.5 泛型限定案例 需求:创建老师类和班主任类,提供姓名和年龄属性,并都具有work方法。将多个老师对象和多个班主任对象存储到两个集合中。提供一个方法可以同时遍历这两个集合,并能调用work方法。
Employee员工类:
1 2 3 4 5 6 7 8 9 10 11 12 13 14 public abstract class Employee private String name;private int age;public Employee () public Employee (String name, int age) this .name = name;this .age = age;public abstract void work ()
Teacher类:
1 2 3 4 5 6 7 8 9 10 11 12 13 14 public class Teacher extends Employee public Teacher () public Teacher (String name, int age) super (name, age);@Override public void work () "老师在上课" );
Manager类:
1 2 3 4 5 6 7 8 9 10 11 12 13 14 15 public class Manager extends Employee public Manager () public Manager (String name, int age) super (name, age);@Override public void work () "班主任管理班级" );
测试类:
1 2 3 4 5 6 7 8 9 10 11 12 13 14 15 16 17 18 19 20 public static void main (String[] args) throws UnsupportedEncodingException new ArrayList<Teacher>();new Teacher("张三" ,30 ));new Teacher("李四" ,32 ));new ArrayList<Manager>();new Manager("王五" ,25 ));new Manager("赵六" ,23 ));public static void getElement (List<? extends Employee> list) while (it.hasNext()){"::" +employee.getAge());
第四章 红黑树 红黑树
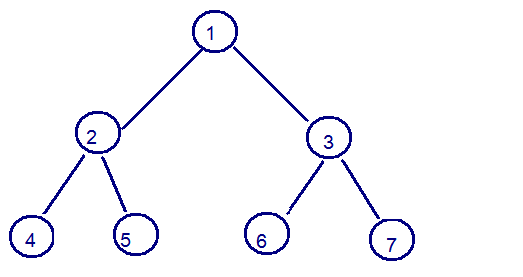
二叉树 :binary tree ,是每个结点不超过2的有序树(tree) 。
简单的理解,就是一种类似于我们生活中树的结构,只不过每个结点上都最多只能有两个子结点。
二叉树是每个节点最多有两个子树的树结构。顶上的叫根结点,两边被称作“左子树”和“右子树”。
如图:
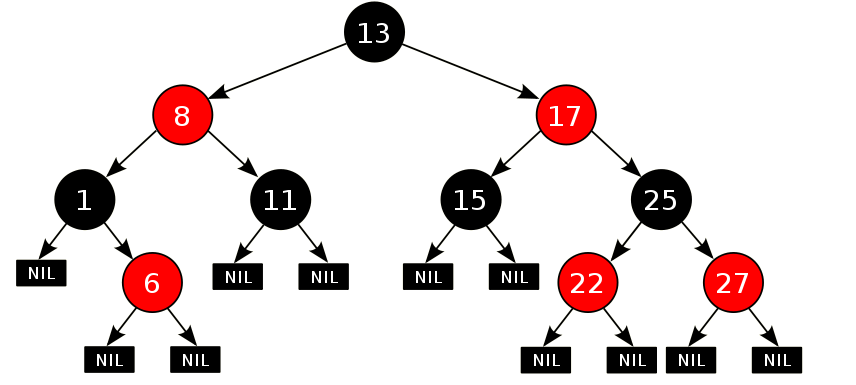
我们要说的是二叉树的一种比较有意思的叫做红黑树 ,红黑树本身就是一颗二叉查找树,将节点插入后,该树仍然是一颗二叉查找树。
如图:
红黑树可以通过红色节点和黑色节点尽可能的保证二叉树的平衡,从而来提高效率。
红黑树的约束:
节点可以是红色的或者黑色的。
根节点是黑色的。
叶子节点(特指空节点)是黑色的。
每个红色节点的子节点都是黑色的。
任何一个节点到其每一个叶子节点的所有路径上黑色节点数相同。
红黑树的特点:
速度特别快,趋近平衡树。
第五章 Set集合 5.1 概述 java.util.Set接口和java.util.List接口一样,同样继承自Collection接口,它与Collection接口中的方法基本一致,并没有对Collection接口进行功能上的扩充,只是比Collection接口更加严格了。与List接口不同的是,Set接口下的集合不存储重复的元素。
Set集合有多个子类,这里我们介绍其中的java.util.HashSet、java.util.LinkedHashSet这两个集合。
注意 :集合取出元素的方式可以采用:迭代器、增强for。
5.2 Set集合存储并遍历 1 2 3 4 5 6 7 8 9 10 11 12 13 14 15 16 public static void main (String[] args) new HashSet<String>();"java" );"hello" );"world" );"heima" );"itcast" );while (it.hasNext()){for (String str : set){
5.3 对象的哈希值 java.lang.Object类中定义了方法:public int hashCode()返回对象的哈希码值,任何类都继承Object,也都会拥有此方法。
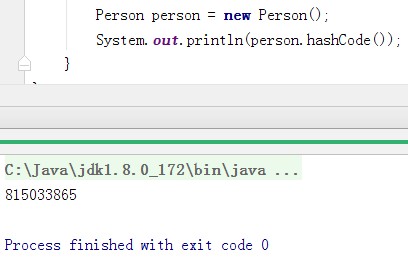
定义Person类,不添加任何成员,直接调用Person对象的hashCode()方法,执行Object类的hashCode():
测试类
1 2 3 4 public static void main (String[] args) new Person();int code = person.hashCode();
看到运行结果,就是一个int类型的整数,如果将这个整数转为十六进制就看到所谓的对象地址值,但是他不是地址值,我们将他称为对象的哈希值。
Person类重写hashCode()方法:直接返回0
1 public int hashCode () return 0 ;}
运行后,方法将执行Person类的重写方法,结果为0,属于Person类自定义对象的哈希值,而没有使用父类Object类方法hashCode()。
5.4 String对象的哈希值 1 2 3 4 5 6 public static void main (String[] args) new String("abc" );new String("abc" );
程序分析 :两个字符串对象都是采用new关键字创建的,s1==s2的结果为false,但是s1,s2两个对象的哈希值却是相同的,均为96354,原因是String类继承Object,重写了父类方法hashCode()建立自己的哈希值。
String类的hashCode方法源码分析: 字符串底层实现是字符数组,被final修饰,一旦创建不能修改。
1 private final char value[];
定义字符串“abc”或者是new String(“abc”),都会转成char value[]数组存储,长度为3。
1 2 3 4 5 6 7 8 9 10 11 12 13 14 15 16 public int hashCode () int h = hash;if (h == 0 && value.length > 0 ) {char val[] = value;for (int i = 0 ; i < value.length; i++) {31 * h + val[i];return h;
String的哈希算法分析:
int h = hash,hash是成员变量,默认值0,int h = 0。
判断h==0为true && value.length>0,数组value的长度为3,保存三个字符abc,判断结果整体为true。
char val[] = value,将value数组赋值给val数组。
for循环3次,将value数组进行遍历,取出abc三个字符。
第一次循环: h = 31 * h + val[0],h = 31 * 0 + 97结果:h = 97。
第二次循环: h = 31 * 97 + val[1],h = 31 * 97 + 98结果:h = 3105。
第三次循环: h = 31 * 3105 + val[2],h = 31 * 3105 + 99结果:h = 96354。
return 96354。
算法:31 * 上一次的哈希值+字符的ASCII码值,31属于质数,每次乘以31是为了降低字符串不同,但是计算出相同哈希值的概率。
5.5 哈希表 什么是哈希表呢?
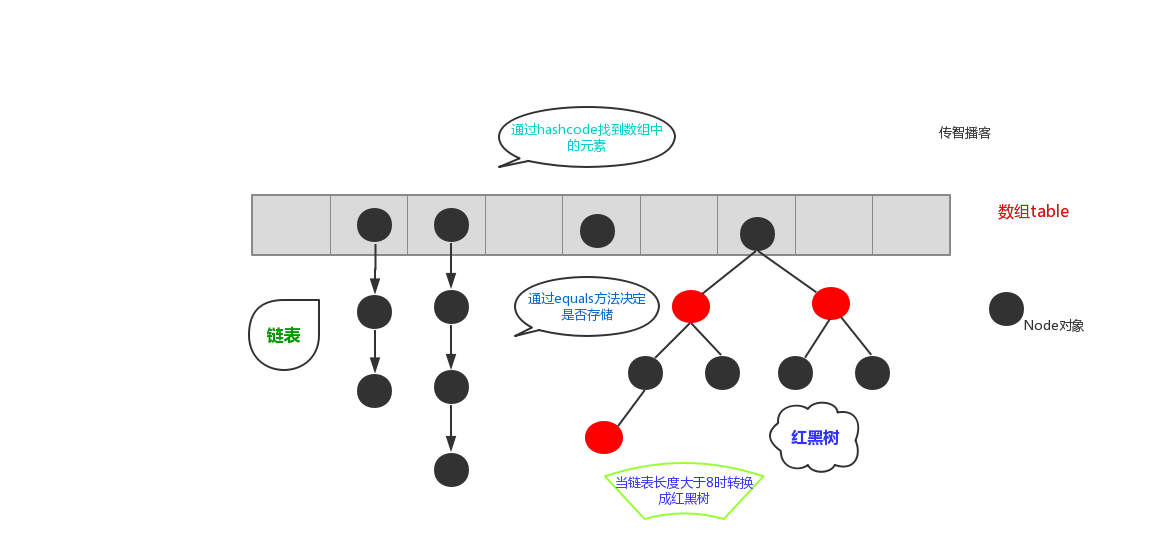
在JDK1.8 之前,哈希表底层采用数组+链表实现,即使用数组处理冲突,同一hash值的链表都存储在一个数组里。但是当位于一个桶中的元素较多,即hash值相等的元素较多时,通过key值依次查找的效率较低。而JDK1.8中,哈希表存储采用数组+链表+红黑树实现,当链表长度超过阈值(8)时,将链表转换为红黑树,这样大大减少了查找时间。
哈希表的初始化容量,数组长度为16个。
加载因子为0.75。
指示当数组的容量被使用到长度的75%时,进行扩容。
简单的来说,哈希表是由数组+链表+红黑树(JDK1.8增加了红黑树部分)实现的,如下图所示。
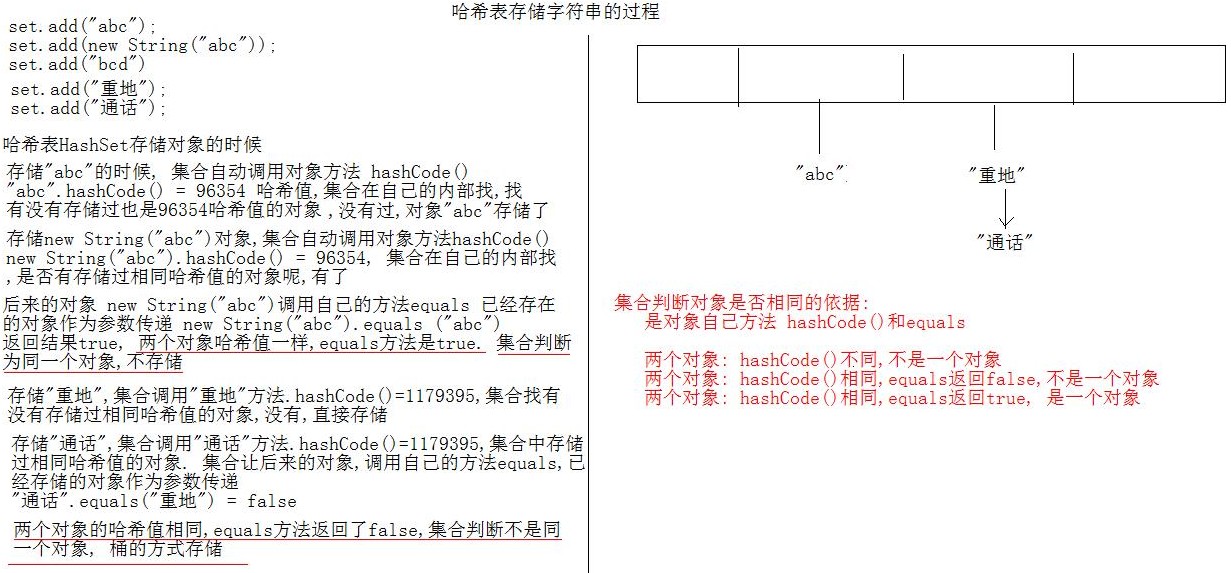
5.6 哈希表存储字符对象的过程图
总而言之,JDK1.8 引入红黑树大程度优化了HashMap的性能,那么对于我们来讲保证HashSet集合元素的唯一,其实就是根据对象的hashCode和equals方法来决定的。如果我们往集合中存放自定义的对象,那么保证其唯一,就必须复写hashCode和equals方法建立属于当前对象的比较方式。
5.7 HashSet集合特点
HashSet底层数据结构是单向哈希表。
不保证元素的迭代顺序,存储元素的顺序和取出元素的顺序不一致。
此集合不允许存储重复元素。
存储在此集合中的元素应该重写hashCode()和equals()方法保证唯一性。
此集合具有数组,链表,红黑树三种结构特点。
线程不安全,运行速度快。
5.8 HashSet存储自定义类型 给HashSet中存放自定义类型元素时,需要重写对象中的hashCode和equals方法,建立自己的比较方式,才能保证HashSet集合中的对象唯一.
创建自定义Student类:
1 2 3 4 5 6 7 8 9 10 11 12 13 14 15 16 17 18 19 20 21 public class Student private String name;private int age;@Override public boolean equals (Object o) if (this == o)return true ;if (o == null || getClass() != o.getClass())return false ;return age == student.age &&@Override public int hashCode () return Objects.hash(name, age);
创建测试类:
1 2 3 4 5 6 7 8 9 10 11 12 13 public static void main (String[] args) new HashSet<Student>();new Student("于谦" , 43 ));new Student("郭德纲" , 44 ));new Student("于谦" , 43 ));new Student("郭麒麟" , 23 ));for (Student stu2 : stuSet) {
5.9 哈希表源代码分析 HashSet集合本身并不提供功能,底层依赖HashMap集合,HashSet构造方法中创建了HashMap对象:
因此源代码分析是分析HashMap集合的源代码,HashSet集合中的add方法调研的是HashMap集合中的put方法。
HashMap无参数构造方法的分析 1 2 3 4 5 static final float DEFAULT_LOAD_FACTOR = 0.75f ;public HashMap () this .loadFactor = DEFAULT_LOAD_FACTOR;
解析:使用无参数构造方法创建HashMap对象,将加载因子设置为默认的加载因子,loadFactor=0.75F。
HashMap有参数构造方法分析 1 2 3 4 5 6 7 8 9 10 11 12 public HashMap (int initialCapacity, float loadFactor) if (initialCapacity < 0 )throw new IllegalArgumentException("Illegal initial capacity: " +if (initialCapacity > MAXIMUM_CAPACITY)if (loadFactor <= 0 || Float.isNaN(loadFactor))throw new IllegalArgumentException("Illegal load factor: " +this .loadFactor = loadFactor;this .threshold = tableSizeFor(initialCapacity);
解析:带有参数构造方法,传递哈希表的初始化容量和加载因子
如果initialCapacity(初始化容量)小于0,直接抛出异常。
如果initialCapacity大于最大容器,initialCapacity直接等于最大容器
MAXIMUM_CAPACITY = 1 << 30 是最大容量 (1073741824)
如果loadFactor(加载因子)小于等于0,直接抛出异常
tableSizeFor(initialCapacity)方法计算哈希表的初始化容量。
注意:哈希表是进行计算得出的容量,而初始化容量不直接等于我们传递的参数。
tableSizeFor方法分析 1 2 3 4 5 6 7 8 9 static final int tableSizeFor (int cap) int n = cap - 1 ;1 ;2 ;4 ;8 ;16 ;return (n < 0 ) ? 1 : (n >= MAXIMUM_CAPACITY) ? MAXIMUM_CAPACITY : n + 1 ;
解析:该方法对我们传递的初始化容量进行位移运算,位移的结果是 8 4 2 1 码
例如传递2,结果还是2,传递的是4,结果还是4。
例如传递3,结果是4,传递5,结果是8,传递20,结果是32。
Node 内部类分析 哈希表是采用数组+链表的实现方法,HashMap中的内部类Node非常重要
1 2 3 4 5 6 7 8 9 10 11 static class Node <K ,V > implements Map .Entry <K ,V > final int hash;final K key;int hash, K key, V value, Node<K,V> next) {this .hash = hash;this .key = key;this .value = value;this .next = next;
解析:内部类Node中具有4个成员变量
hash,对象的哈希值
key,作为键的对象
value,作为值的对象(讲解Set集合,不牵扯值的问题)
next,下一个节点对象
存储元素的put方法源码 1 2 3 public V put (K key, V value) return putVal(hash(key), key, value, false , true );
解析:put方法中调研putVal方法,putVal方法中调用hash方法。
hash(key)方法:传递要存储的元素,获取对象的哈希值
putVal方法,传递对象哈希值和要存储的对象key
putVal方法源码 1 2 3 Node<K,V>[] tab; Node<K,V> p; int n, i;if ((tab = table) == null || (n = tab.length) == 0 )
解析:方法中进行Node对象数组的判断,如果数组是null或者长度等于0,那么就会调研resize()方法进行数组的扩容。
resize方法的扩容计算 1 2 3 4 5 6 7 8 9 if (oldCap > 0 ) {if (oldCap >= MAXIMUM_CAPACITY) {return oldTab;else if ((newCap = oldCap << 1 ) < MAXIMUM_CAPACITY &&1 ;
解析:计算结果,新的数组容量=原始数组容量<<1,也就是乘以2。
确定元素存储的索引 1 2 if ((p = tab[i = (n - 1 ) & hash]) == null )null );
解析:i = (数组长度 - 1) & 对象的哈希值,会得到一个索引,然后在此索引下tab[i],创建链表对象。
不同哈希值的对象,也是有可能存储在同一个数组索引下。
遇到重复哈希值的对象 1 2 3 4 Node<K,V> e; K k;if (p.hash == hash &&null && key.equals(k))))
解析:如果对象的哈希值相同,对象的equals方法返回true,判断为一个对象,进行覆盖操作。
1 2 3 4 5 6 7 8 else {for (int binCount = 0 ; ; ++binCount) {if ((e = p.next) == null ) {null );if (binCount >= TREEIFY_THRESHOLD - 1 ) break ;
解析:如果对象哈希值相同,但是对象的equals方法返回false,将对此链表进行遍历,当链表没有下一个节点的时候,创建下一个节点存储对象。
第六章 LinkedHashSet集合 6.1 概述 具有可预知迭代顺序的 Set 接口的哈希表和链接列表实现。此实现与 HashSet的不同之外在于,后者维护着一个运行于所有条目的双重链接列表。此链接列表定义了迭代顺序,即按照将元素插入到 set 中的顺序(插入顺序 )进行迭代。
1 2 3 4 5 6 7 8 9 10 11 12 13 14 public static void main (String[] args) new LinkedHashSet<String>();"bbb" );"aaa" );"abc" );"bbc" );while (it.hasNext()) {for (String s : set){