day10【多线程】 今日内容
Lock接口
线程通信,等待与唤醒
多生产多消费
Condition接口
线程池思想
JDK提供的线程池
Callable和Future接口
Timer定时器
目标
第一章 Lock锁 1.1 概述 java.util.concurrent.locks.Lock机制提供了比synchronized 代码块和synchronized 方法更广泛的锁定操作,同步代码块/同步方法具有的功能Lock都有,除此之外更强大,更体现面向对象。
1.2 Lock接口 Lock锁也称同步锁,加锁与释放锁方法化了,如下:
接口实现类:java.util.locks.lock.ReentrantLock
public void lock() :加同步锁。
public void unlock():释放同步锁。
使用如下:
1
2
3
4
5
6
7
8
9
10
11
12
13
14
15
16
17
18
19
20
21
22
23
24
25
26
27
28
29
30
public class Ticket implements Runnable private int ticket = 100 ;private Lock lock = new ReentrantLock();@Override public void run () while (true ){if (ticket>0 ){try {50 );catch (InterruptedException e) {"正在卖:" +ticket--);
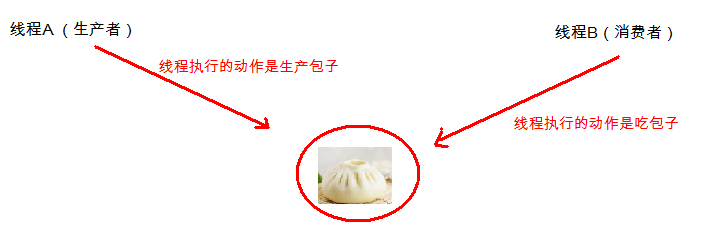
第二章 生产者与消费者 2.1 案例需求
1
2
3
4
定义一个变量,包子铺线程完成生产包子,包子进行++操作;吃货线程完成购买包子,包子变量打印出来。 1. 当包子没有时(包子状态为false),吃货线程等待。 2. 包子铺线程生产包子(即包子状态为true),并通知吃货线程(解除吃货的等待状态)。 3. 保证线程安全,必须生产一个消费一个,不能同时生产或者消费多个。
2.2 线程等待唤醒方法 线程等待和唤醒的方法定义在java.lang.Object类中。
方法声明
方法含义
public final void wait()
当前线程等待,当前线程必须拥有此对象监视器。
public final void notify()
唤醒在此对象监视器上等待的单个线程。
public final void notifyAll()
唤醒在此对象监视器上等待的所有线程。
2.2 案例实现 包子铺类:
1
2
3
4
5
6
7
8
9
10
11
12
13
14
15
16
17
18
19
20
21
22
23
public class BaoZiPu private int baoZiCount;private boolean flag;public void setFlag (boolean flag) this .flag = flag;public boolean getFlag () return flag;public void get () "消费第" +baoZiCount+"个包子" );public void set () "生产第" +baoZiCount+"个包子" );
生产者类:
1
2
3
4
5
6
7
8
9
10
11
12
13
14
15
16
17
18
19
20
21
22
23
24
25
26
27
28
29
public class Product implements Runnable private BaoZiPu baoZiPu;public Product (BaoZiPu baoZiPu) this .baoZiPu = baoZiPu;@Override public void run () while (true ){synchronized (baoZiPu) {if (baoZiPu.getFlag() == true ){try {catch (InterruptedException e) {true );
消费者类:
1
2
3
4
5
6
7
8
9
10
11
12
13
14
15
16
17
18
19
20
21
22
23
24
25
26
27
public class Customer implements Runnable private BaoZiPu baoZiPu;public Customer (BaoZiPu baoZiPu) this .baoZiPu = baoZiPu;@Override public void run () while (true ){synchronized (baoZiPu) {if (baoZiPu.getFlag()==false ) {try {catch (InterruptedException ex) {false );
测试类:
1
2
3
4
5
6
7
8
public static void main (String[] args) new BaoZiPu();new Product(baoZiPu);new Customer(baoZiPu);new Thread(product).start();new Thread(customer).start();
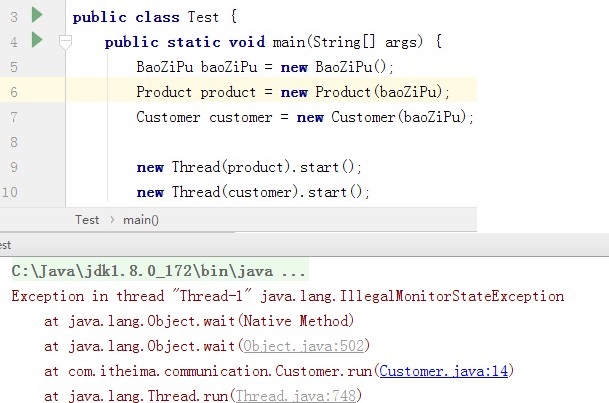
运行结果的异常分析:
程序出现无效的监视器状态异常。
wait()或者notify()方法会抛出此异常。
程序中,wait()或者notify()方法的调用者是this对象。
而this对象在同步中并不是锁对象,只有作为锁的对象才能调用wait()或者notify()方法。
而锁对象是生产者和消费者共享的包子铺对象。
程序改造: 1 2 3 4 5 6 7 8 9 10 11 12 13 14 15 16 17 18 19 20 21 22 23 24 25 26 27 28 29 public class Product implements Runnable private BaoZiPu baoZiPu;public Product (BaoZiPu baoZiPu) this .baoZiPu = baoZiPu;@Override public void run () while (true ){synchronized (baoZiPu) {if (baoZiPu.getFlag() == true ){try {catch (InterruptedException e) {true );
1 2 3 4 5 6 7 8 9 10 11 12 13 14 15 16 17 18 19 20 21 22 23 24 25 26 27 public class Customer implements Runnable private BaoZiPu baoZiPu;public Customer (BaoZiPu baoZiPu) this .baoZiPu = baoZiPu;@Override public void run () while (true ){synchronized (baoZiPu) {if (baoZiPu.getFlag()==false ) {try {catch (InterruptedException ex) {false );
2.3 代码优化 通过线程等待与唤醒,实现了生产者与消费者案例,但是代码维护性差,阅读性差,使用同步方法进行代码的优化。在包子铺类中的get(),set()方法进行同步方法的改进。
注意 :一旦方法同步后,this就是锁对象。
包子铺类:变量flag只在类中使用,因此可以去掉get/set方法。
1 2 3 4 5 6 7 8 9 10 11 12 13 14 15 16 17 18 19 20 21 22 23 24 25 26 27 28 29 30 31 32 33 34 35 public class BaoZiPu private int baoZiCount;private boolean flag;public synchronized void get () if (flag == false )try {this .wait();catch (InterruptedException ex){}"消费第" +baoZiCount+"个包子" );false ;this .notify();public synchronized void set () if (flag == true )try {this .wait();catch (InterruptedException ex){}"生产第" +baoZiCount+"个包子" );true ;this .notify();
生产者类:
1
2
3
4
5
6
7
8
9
10
11
12
13
public class Product implements Runnable private BaoZiPu baoZiPu;public Product (BaoZiPu baoZiPu) this .baoZiPu = baoZiPu;@Override public void run () while (true ){
消费者类:
1
2
3
4
5
6
7
8
9
10
11
12
public class Customer implements Runnable private BaoZiPu baoZiPu;public Customer (BaoZiPu baoZiPu) this .baoZiPu = baoZiPu;@Override public void run () while (true ){
2.4 sleep()和wait()方法的区别
sleep()是Thread类静态方法,不需要对象锁。
wait()方法是Object类的方法,被锁对象调用,而且只能出现在同步中。
执行sleep()方法的线程不会释放同步锁。
执行wait()方法的线程要释放同步锁,被唤醒后还需获取锁才能执行。
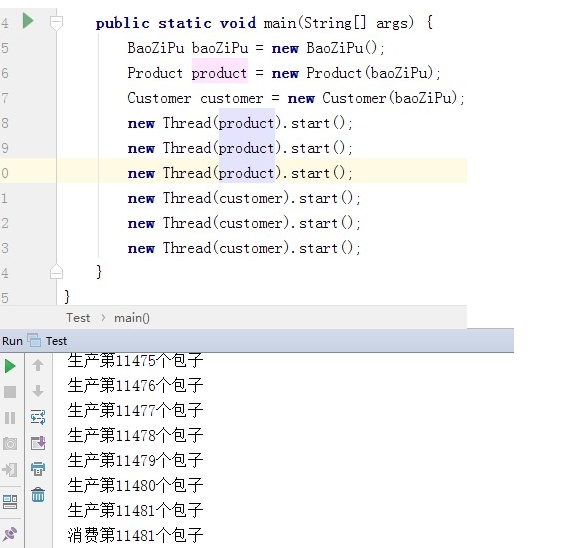
第三章 多线程和多消费 3.1 概述 上一章节,我们实现了生产者和消费者案例,但是如果我们开启多个生产者线程和多个生产者线程会发生什么现象呢,线程还会安全吗?
3.2 线程安全原因分析 当开启了多个线程后,数据出现了安全问题。问题就出现在等待和唤醒环节。我们将线程分成了生产者和消费者两个部分,需要生产者线程唤醒消费者线程,而消费者线程要唤醒生产者线程。但是线程的唤醒是按照队列形式进行,先等待的会先被唤醒。很可能出现生产者线程又唤醒了生产者线程,消费者线程唤醒了消费者线程。因此我们需要将线程全部唤醒,使用notifyAll()方法。
全部唤醒后,线程依然不安全,是因为线程判断完标志位后就会等待,当被唤醒后,就不会再判断标志位了,我们必须让线程在唤醒后,还要继续判断标志位,允许生存才能生产,不运行生产就要继续等待。
3.3 多生产多消费实现 1 2 3 4 5 6 7 8 9 10 11 12 13 14 15 16 17 18 19 20 21 22 23 24 25 26 27 28 29 30 31 32 33 34 public class BaoZiPu private int baoZiCount;private boolean flag;public synchronized void get () while (flag == false )try {this .wait();catch (InterruptedException ex){}"消费第" +baoZiCount+"个包子" );false ;this .notifyAll();public synchronized void set () while (flag == true )try {this .wait();catch (InterruptedException ex){}"生产第" +baoZiCount+"个包子" );true ;this .notifyAll();
第四章 Condition接口 4.1 等待唤醒的弊端 多生产与多消费案例中,我们使用了线程通信的相关方法wait()和notify(),notifyAll()。
public final native void wait(long timeout) throws InterruptedException
public final native void notify()
public final native void notifyAll()
以上三个方法都是本地方法,要和操作系统进行交互,因此线程等待唤醒需要消耗系统资源,程序效率降低。另外我们一次唤醒所有的线程,也会浪费很多资源,为了解决这些弊端,JDK1.5版本的时候出现了Lock接口和Condition接口。
4.2 Condition接口介绍 Condition 将 Object 监视器方法(wait、notify 和 notifyAll)分解成截然不同的对象,以便通过将这些对象与任意 Lock实现组合使用,为每个对象提供多个等待 set(wait-set)。其中,Lock 替代了synchronized 方法和语句的使用,Condition 替代了 Object 监视器方法的使用。
4.3 Condition接口常用方法 Lock接口的方法newCondition()获取
public Condition newCondition()
常用方法:
方法声明
方法含义
public void await()
线程等待,释放锁,进入队列
public void signal()
唤醒一个等待的线程,出队列,获取锁
public void singalAll()
唤醒所有等待的线程
4.4 Condition接口方法和Object类方法比较
Condition可以和任意的Lock组合,实现管理线程的阻塞队列。
一个线程的案例中,可以使用多个Lock锁,每个Lock锁上可以结合Condition对象。
synchronized同步中做不到将线程划分到不同的队列中。
Object类wait()和notify()都要和操作系统交互,并通知CPU挂起线程,唤醒线程,效率低。
Condition接口方法await()不和操作系统交互,而是让释放锁,并存放到线程队列容器中,当被signal()唤醒后,从队列中出来,从新获取锁后在执行。
因此使用Lock和Condition的效率比Object要快很多。
4.5 生产者和消费者案例改进 1 2 3 4 5 6 7 8 9 10 11 12 13 14 15 16 17 18 19 20 21 22 23 24 25 26 27 28 29 30 31 32 33 34 35 36 37 38 39 40 41 42 43 44 45 46 47 48 49 50 51 52 53 public class BaoZiPu private int baoZiCount;private boolean flag;private Lock lock = new ReentrantLock();private Condition productCondition = lock.newCondition();private Condition customerCondition = lock.newCondition();public void setFlag (boolean flag) this .flag = flag;public boolean getFlag () return flag;public void get () while (flag == false )try {catch (InterruptedException ex){}"消费第" +baoZiCount+"个包子" );false ;public void set () while (flag == true )try {catch (InterruptedException ex){}"生产第" +baoZiCount+"个包子" );true ;
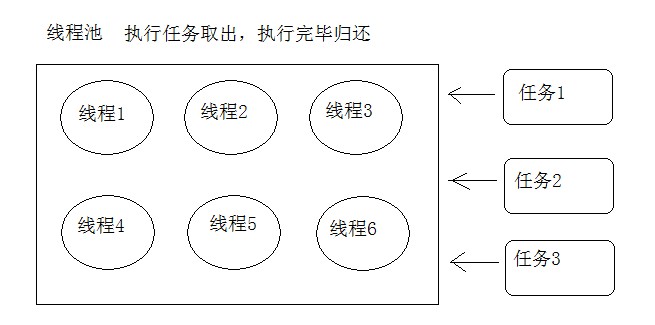
第五章 线程池Thread Pool 5.1 概述 创建线程每次都要和操作系统进行交互,线程执行完任务后就会销毁,如果频繁的大量去创建线程肯定会造成系统资源开销很大,降低程序的运行效率。
线程池思想就很好的解决了频繁创建线程的问题,我们可以预先创建好一些线程,把他们放在一个容器中,需要线程执行任务的时候,从容器中取出线程,任务执行完毕后将线程在放回容器。
5.2 JDK线程池 java.util.concurrent 包中定义了线程池相关的类和接口。
Executors类 创建线程池对象的工厂方法,使用此类可以创建线程池对象。
方法声明
方法含义
static ExecutorService newFixedThreadPool(int nThreads)
创建一个可重用固定线程数的线程池,以共享的无界队列方式来运行这些线程。无界对象就是链表存储结构。
ExecutorService接口 线程池对象的管理接口,提交线程任务,关闭线程池等功能。
方法声明
方法含义
Future<?> submit(Runnable task)
提交线程执行的任务,方法将返回null,因为run()(方法没有返回值。
Futuresubmit(Callable task) 提交线程执行的任务,返回Future接口对象。
void shutdown()
关闭线程池,但是要等所有线程都完成任务后再关闭,但是不接收新任务。
Callable接口 线程执行的任务接口,类似于Runnable接口。
接口方法public V call()throw Exception
线程要执行的任务方法
比起run()方法,call()方法具有返回值,可以获取到线程执行的结果。
Future接口 异步计算结果,就是线程执行完成后的结果。
接口方法public V get()获取线程执行的结果,就是获取call()方法返回值。
5.3 实现线程池程序 需求:创建有2个线程的线程池,分别提交线程执行的任务,一个线程执行字符串切割,一个执行1+100的和。
实现Callable接口,字符串切割功能:
1
2
3
4
5
6
7
8
9
10
11
12
13
public class MyStringCallable implements Callable<String[]> {private String str;public MyStringCallable (String str ) this .str = str;@Override public String[] call() throws Exception {return str.split(" +" );
实现Callable接口,1+100求和:
1
2
3
4
5
6
7
8
9
10
public class MySumCallable implements Callable <Integer > @Override public Integer call () throws Exception int sum = 0 ;for (int x = 1 ; x<= 100 ; x++){return sum;
测试类:
1
2
3
4
5
6
7
8
9
10
11
public static void main (String[] args) throws Exception 2 );new MyStringCallable("aa bbb cc d e" ));new MySumCallable());
第六章 Timer定时器 6.1 概述 Java中的定时器,可以根据指定的时间来运行程序。
java.util.Timer一种工具,线程用其安排以后在后台线程 中执行的任务。可安排任务执行一次,或者定期重复执行。定时器是使用新建的线程来执行,这样即使主线程main结束了,定时器也依然会继续工作。
6.2 Timer类的方法
构造方法:无参数。
定时方法:public void schedule(TimerTask task,Date firstTime,long period)
TimerTask是定时器要执行的任务,一个抽象类,我们需要继承并重写方法run()
firstTime定时器开始执行的时间
period时间间隔,毫秒值
6.3 定时器案例 1 2 3 4 5 6 7 8 9 public static void main (String[] args) throws Exception new Timer();new TimerTask() {@Override public void run () "线程定时任务" );new Date(),3000 );
第七章 ConcurrentHashMap 7.1 介绍 java.util.concurrent.ConcurrentHashMap支持获取的完全并发和更新的所期望可调整并发的哈希表。
此集合实现Map接口,因此Map集合中的所有功能都可以直接使用。
ConcurrentHashMap集合特点
底层是哈希表结构
此集合是线程安全的,但是某些功能不必锁定。比如get()
不会抛出ConcurrentModificationException并发修改异常
ConcurrentHashMap集合的锁定特点
为了提高效率,不会将整个集合全部锁定。
当添加或者移除元素时,是对链表进行操作,链表存储在数组中,那么就只会针对这个链表进行锁定。
7.2 迭代中添加元素 1 2 3 4 5 6 7 8 9 10 11 12 13 14 15 public static void main (String[] args) throws Exception new ConcurrentHashMap<String, String>();"1" ,"a" );"2" ,"b" );"3" ,"c" );while (it.hasNext()){"4" ,"4" );"=" +next.getValue());
7.3 线程安全测试 1 2 3 4 5 6 7 8 9 10 11 12 13 14 15 16 17 18 19 20 21 22 23 24 25 26 27 28 29 30 31 32 33 34 public static void main (String[] args) throws Exception new ConcurrentHashMap<String, Integer>();new HashMap<String, Integer>();for (int x = 0 ; x < 2000 ; x++){"count" +x,x);new Runnable() {@Override public void run () for (int i = 0 ; i < 500 ;i++){"count" +i);new Runnable() {@Override public void run () for (int i = 1000 ; i < 1500 ;i++){"count" +i);new Thread(r1).start();new Thread(r2).start();2000 );